As a supplier of the Starter - Delco PG - 260L, I often get asked by customers whether they can install this product by themselves. In this blog post, I'll break down the process, the factors to consider, and provide some guidance to help you make an informed decision.


Understanding the Starter - Delco PG - 260L
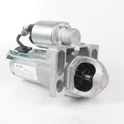
Before diving into the installation process, let's first understand the Starter - Delco PG - 260L. This starter is a high - quality product known for its reliability and performance. There are different variants available, such as the 1.6KW Starter - Delco PG - 260L, the 12V Starter - Delco PG - 260L, and the 11 - Tooth Pinion Starter - Delco PG - 260L. Each variant is designed to meet specific requirements in different applications, whether it's for a small engine or a more heavy - duty setup.
Can You Install It Yourself?
Whether you can install the Starter - Delco PG - 260L by yourself depends on several factors. Let's analyze these factors one by one:
Technical Skills
Installing a starter requires a certain level of technical knowledge. You need to have a basic understanding of automotive or machinery electrical systems. If you've worked on engines before, particularly on replacing starters or other electrical components, you may have the necessary skills. For example, you should be able to identify electrical connections, use basic hand tools like wrenches and pliers, and follow a wiring diagram.
However, if you're new to this kind of work, it might be a bit challenging. The Starter - Delco PG - 260L has precise electrical connections, and incorrect installation can lead to problems such as short - circuits or the starter not working at all. So, if you're not confident in your technical abilities, it might be better to seek professional help.
Tools
You'll need the right tools to install the Starter - Delco PG - 260L. Common tools required include socket wrenches of various sizes, pliers, a wiring tester, and possibly a torque wrench to ensure proper tightening of bolts. If you don't have these tools at home, it could be an obstacle. You could either purchase the tools, which might be costly if you rarely do this kind of work, or borrow them from a friend or a local tool rental shop.
Safety
Safety is of utmost importance when working on any electrical or mechanical component. When installing the starter, you'll be dealing with the vehicle or machinery's electrical system, which can pose a risk of electric shock. You also need to be careful when removing and installing heavy components to avoid injuries.
Before starting the installation, make sure to disconnect the battery to prevent any electrical accidents. Wear appropriate safety gear, such as gloves and safety glasses. If you're not familiar with safety procedures, it's better not to attempt the installation on your own.
The Installation Process
If you've decided that you have the skills, tools, and safety knowledge to install the Starter - Delco PG - 260L by yourself, here's a general overview of the installation process:
Step 1: Preparation
First, gather all the necessary tools and the new Starter - Delco PG - 260L. Make sure you have the correct variant for your application. Park the vehicle or turn off the machinery and let it cool down if it has been running. Disconnect the negative terminal of the battery to prevent electrical shock and short - circuits.
Step 2: Locate the Old Starter
Find the old starter in your vehicle or machinery. It's usually located near the engine's flywheel. You may need to remove some components, such as air intake ducts or heat shields, to access the starter.
Step 3: Remove the Old Starter
Use the appropriate socket wrenches to remove the bolts that hold the starter in place. Disconnect the electrical connections from the starter. Be careful to note the position of each wire and connection so that you can reinstall them correctly on the new starter.
Step 4: Install the New Starter
Position the new Starter - Delco PG - 260L in place and secure it with the bolts. Tighten the bolts to the specified torque using a torque wrench if available. Reconnect the electrical connections, following the notes you made during the removal process.
Step 5: Reassemble and Test
Reinstall any components that you removed to access the starter. Reconnect the negative terminal of the battery. Try to start the vehicle or machinery. If it starts smoothly, the installation was successful. If not, double - check all the connections and make sure the starter is properly installed.
Troubleshooting Tips
Even if you follow the installation process carefully, you may encounter some issues. Here are some common problems and their possible solutions:
- Starter doesn't engage: Check the electrical connections to make sure they are secure. Also, check the battery to ensure it has enough charge.
- Strange noises: This could indicate a misaligned starter or a problem with the flywheel. Double - check the installation and alignment of the starter.
- Electrical problems: If there are sparks or other electrical issues, immediately disconnect the battery and check the wiring for any damage or incorrect connections.
Conclusion and a Call to Action
Installing the Starter - Delco PG - 260L by yourself is possible if you have the right skills, tools, and knowledge of safety procedures. However, if you're unsure, it's always better to consult a professional.
If you're interested in purchasing the Starter - Delco PG - 260L for your application, we're here to assist you. We can provide detailed product information, help you choose the right variant, and even offer technical support if needed. Contact us to start a procurement negotiation and get the best deal on this high - quality starter.
References
- Automotive repair manuals for relevant vehicle or machinery models.
- Manufacturer's documentation for the Starter - Delco PG - 260L.