Hey there! As a supplier of 12V Alternators For Valeo, I often get asked this question: "Can I replace the 12V Alternator For Valeo by myself?" Well, let's dig into this topic and see what's what.
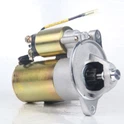
First off, let's talk a bit about what a 12V Alternator For Valeo is. It's a crucial part of your vehicle's electrical system. The alternator's main job is to convert mechanical energy from the engine into electrical energy. This electricity is then used to power all the electrical components in your car, like the lights, radio, and charging ports. And of course, it keeps your battery charged up. Valeo is a well - known brand in the automotive industry, and their alternators are known for their quality and reliability.
Now, the big question: Can you replace it by yourself? The short answer is, it depends. If you're a bit of a DIY enthusiast and have some basic mechanical skills, it might be doable. But there are several factors you need to consider.
Tools and Equipment
You'll need a proper set of tools to get the job done. This includes wrenches, sockets, and a ratchet. You might also need a jack to lift the vehicle if the alternator is located in a hard - to - reach place. Without the right tools, you're going to have a really tough time. For example, if you don't have the correct size socket, you won't be able to remove the bolts holding the alternator in place.
Safety First
Safety is super important when working on your car. You need to make sure the vehicle is properly supported on jack stands if you're lifting it. Also, always disconnect the battery before starting any work on the alternator. This will prevent any electrical shocks or short circuits. You don't want to end up getting zapped or damaging other electrical components in your car.
Technical Knowledge
You need to have a good understanding of your vehicle's electrical system. The alternator is connected to various wires and belts. You need to know which wires go where and how to properly reconnect them. If you make a mistake, it could lead to all sorts of problems, like the alternator not working correctly or even causing damage to other parts of the car. For instance, if you connect the positive and negative wires incorrectly, it could fry the alternator or other electrical components.
Step - by - Step Process
Let's break down the process of replacing the 12V Alternator For Valeo.
Step 1: Preparation
Park your car on a flat surface and engage the parking brake. Open the hood and locate the alternator. It's usually near the front of the engine, driven by a belt. As I mentioned before, disconnect the battery. Start by removing the negative cable first, then the positive cable. This will prevent any electrical issues while you're working.
Step 2: Remove the Belt
Loosen the tension on the belt that drives the alternator. This can usually be done by using a wrench on the tensioner pulley. Once the belt is loose, slide it off the alternator pulley. Be careful not to damage the belt in the process.
Step 3: Disconnect the Wires
There are usually several wires connected to the alternator. These include the main power wire, the field wire, and the sensor wire. Carefully remove each wire, making sure to remember where they go. You can use a marker or take a picture to help you with the reinstallation.
Step 4: Remove the Alternator
Using your wrenches or sockets, remove the bolts that hold the alternator in place. Once the bolts are removed, you should be able to lift the alternator out of its mounting bracket.
Step 5: Install the New Alternator
Place the new 12V Alternator For Valeo in the mounting bracket and secure it with the bolts. Make sure it's properly aligned and tightened.
Step 6: Reconnect the Wires
Reconnect the wires to the alternator in the same way you removed them. Double - check that all the connections are secure.
Step 7: Reinstall the Belt
Put the belt back on the alternator pulley and adjust the tension. You can use the tensioner pulley to make sure the belt is tight enough.
Step 8: Reconnect the Battery
Reconnect the positive cable first, then the negative cable.
If you follow these steps carefully, you should be able to replace the alternator on your own. But again, it's not for everyone. If you're not confident in your abilities, it's best to take your car to a professional mechanic.
Now, as a supplier of 12V Alternators For Valeo, I can offer you high - quality products. We have a wide range of alternators, including the 110A Alternator for Valeo. This alternator is a great option if you need more power for your vehicle's electrical system. And of course, our 12V Alternator for Valeo is a reliable choice for standard applications.
If you're interested in bulk purchasing or have any questions about our products, you can visit our 110A Alternator For Valeo - factory page. We're always happy to talk to potential customers and discuss your needs. Whether you're a repair shop or an individual looking for a replacement alternator, we've got you covered.
In conclusion, replacing the 12V Alternator For Valeo by yourself is possible, but it comes with its challenges. Make sure you have the right tools, knowledge, and safety precautions in place. And if you're in the market for a new alternator, don't hesitate to reach out to us. We're here to provide you with the best products and service.


References
- "Automotive Electrical Systems" by Robert N. Brady
- "How to Repair Your Car" by Haynes Manuals